10 Glass Installation Tips for a Perfect Finish
A flawless glass installation begins long before the panel reaches the frame. It starts with accurate measurements, suitable tools, and a realistic understanding of the opening. A few millimeters can decide whether the glass sits securely or strains against the frame. Small errors become visible quickly.
Glazing consultant Mark Meshulam offers a useful warning: “Glass is strong, but it is not indestructible.” That idea guides every professional installation. Clean suction cups, stable setting blocks, and correctly sized shims protect the panel during handling. The frame must be square, dry, and free from grit. Sealant should match the glass, substrate, and exposure conditions. Manufacturer instructions still matter, even for experienced installers.
This guide presents 10 glass installation tips for a cleaner, safer, and more durable finish. It covers planning, edge protection, alignment, drainage, sealing, and final inspection. You will see why rushing preparation often creates expensive defects later. A crooked frame cannot be rescued by attractive sealant. Not always.
Real job sites are less predictable than diagrams. Dust appears. Openings shift. A delivery may arrive with packaging damage. Skilled installers respond carefully, rather than hiding uncertainty behind speed. They stop when a panel feels forced, reassess the fit, and document problems before continuing. That discipline supports reliable results and reduces avoidable breakage. Yet no checklist removes every surprise. Careful work still requires judgment.

Assess the Glass, Opening, and Installation Conditions
Before setting the glass, inspect the lite, opening, and surrounding materials. Look for edge chips, scratches, distortion, and contamination under strong, angled light. Measure the opening at several points, including width, height, and diagonals. An opening can look square while its sill slopes enough to stress the glass. Use a level, straightedge, and feeler gauge where possible. DOE’s Energy Saver guidance estimates that windows can account for 25–30% of residential heating and cooling energy use, so small perimeter gaps deserve serious attention. Airtightness begins with accurate preparation.
Tip: Check the substrate before carrying the glass. Remove loose mortar, dust, standing water, and incompatible sealant. Confirm that setting blocks match the specified size and position. Keep the glass upright, supported, and protected from hard surfaces. OSHA’s construction fatality data consistently identifies falls as the leading cause of death, making stable access and controlled handling essential. Never improvise with damaged suction equipment. That shortcut may save minutes, not risk.
Installation conditions matter as much as measurements. Follow the sealant manufacturer’s temperature, moisture, and curing requirements, then verify compatibility with coatings, gaskets, and spacers. Industry guidance in the National Glass Association’s Glazing Manual emphasizes proper support, drainage, and edge clearance. I have seen a clean bead conceal a blocked weep path. It looked excellent. It was not. Recheck alignment after temporary supports are removed, and photograph concealed conditions before closing the joint.
Gather Tools, Materials, and Protective Equipment
A perfect glass finish begins before the glass reaches the opening. Gather a steel tape, level, non-marring shims, setting blocks, suction lifters, clean cloths, and a compatible sealant. Keep a utility knife nearby for packaging, not for cutting installed glass. Confirm the panel size, thickness, edge condition, and opening measurements. Tempered glass cannot be cut or altered after production.
Protective equipment is essential, even during a short installation. Wear cut-resistant gloves, safety glasses, long sleeves, and closed-toe, slip-resistant footwear. Use two trained people for large panels. Clear the floor and mark the glass path before lifting. Small stones or loose tools can create dangerous pressure points. Glass can look calm while remaining unpredictable.
Clean the frame with an approved surface cleaner, then check that it is dry and structurally sound. Place setting blocks exactly where the installation instructions require them. They keep the panel from touching hard surfaces. Apply sealant evenly, without forcing it into drainage paths. I once rushed a measurement and created a narrow, uneven joint; correcting it took longer than checking twice. That mistake still influences my preparation. Keep spare shims, fresh cloths, and a waste container within reach. Work slowly when aligning the panel, because suction lifters improve control but do not replace careful handling.
Prepare and Level the Frame for Accurate Glass Placement
A clean, level frame is the foundation of accurate glass placement. Remove dust, old sealant, and loose particles from every contact surface. Check the opening at several points with a spirit level and measuring tape. Do not trust the existing wall to be square. Small deviations can create pressure points in the glass.
Tip: Measure twice before ordering or cutting. Compare the top, middle, and bottom widths. Record the smallest measurement, then confirm the required clearance for setting blocks and sealant. I once overlooked a slight corner twist, and the glass sat unevenly. That mistake was avoidable.
Set the frame on a stable, flat base before positioning the pane. Use compatible shims beneath low areas, but avoid forcing the frame into shape. Recheck the vertical edges after each adjustment. The frame should remain firm without excessive tension. Place setting blocks at the recommended support points, keeping them aligned and clean. Lower the glass gently, rather than sliding it across the frame. Leave space for controlled sealant coverage and drainage. A neat finish depends on preparation, not rushed installation.
Install, Secure, and Seal the Glass Panel Correctly
A perfect glass finish begins before the panel leaves its crate.
Measure the opening at three points, then record the smallest width and height. Check the sill for level, the jambs for plumb, and the corners for square.
Remove dust, oil, and loose mortar from every bonding surface. Use setting blocks and non-staining shims; never let glass rest on metal. Lift with rated suction handles and two trained handlers.
Keep protective gloves on until the edges are fully contained. A small error here can become a visible stress line later.
Secure the panel according to the approved engineering detail, not guesswork. Maintain the specified bite and clearance around every edge. Tighten fasteners evenly, without twisting the frame.
Install compatible backer rod before applying perimeter sealant. Tool the sealant into a continuous, concave joint with no gaps. Do not seal over wet surfaces.
The U.S. Department of Energy estimates windows can represent 25–30% of residential heating and cooling energy use.
That figure makes air leakage more than a cosmetic concern. The IEA’s Global Status Report for Buildings and Construction places buildings near 30% of global final energy demand.
Inspect the seal from both sides, then perform a controlled water test. I have seen rushed joints pass a quick glance and fail after the first cold rain.
Allow curing time, remove excess sealant carefully, and document measurements, materials, and test results.
Inspect the Finished Installation and Perform Final Care
After glass installation, inspect the finished surface in natural daylight. Check every edge for chips, scratches, stress marks, or trapped debris. The sealant should form a continuous, even bead without gaps or smears. Confirm that setting blocks remain correctly positioned and that drainage paths are open. ASTM C1193, the Standard Guide for Use of Joint Sealants, emphasizes proper joint design, adhesion, and sealant application. These details affect long-term water and air control.
Tips: Stand several feet away, then inspect closely. View the glass from different angles. A clean reflection often reveals small distortions. Test operable panels gently, without forcing handles or hinges. Confirm that locks engage smoothly and that frames remain square. The U.S. Department of Energy reports that windows can account for 25–30% of residential heating and cooling energy use. Poor sealing may increase energy loss and indoor discomfort.
Final care should use clean water, a soft cloth, and a mild, non-abrasive cleaner. Remove labels before sunlight bakes adhesive onto the glass. Never scrape coated surfaces with blades unless the manufacturer permits it. I still find rushed cleaning causes avoidable damage, especially around fresh sealant. Allow curing time recommended by the sealant supplier. Record photographs, defects, and corrective work before handover. This record supports reliable maintenance and makes later disputes less subjective.
10 Glass Installation Tips for a Perfect Finish
Inspect the Finished Installation and Perform Final Care
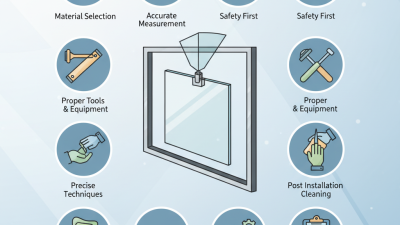
The chart summarizes practical final-inspection checkpoints, including visual review, seal inspection, cleaning, water testing, curing protection, and follow-up care. Always confirm product-specific curing times and local safety requirements before handover.
Reference targets: inspect from approximately 3 m, allow at least 24 hours of protection after sealing, perform a 15-minute controlled water test where appropriate, and complete a follow-up check after 7 days.